
Are you planning to expand the existing router’s wireless range in your home? If the answer is yes, then we recommend you set up a TP Link WiFi extender. Performing TP-Link extender setup in home allows you to turn the dead zones to fun zones. After installing a TP-Link WiFi extender, you will be able to play online multiplayer games without lagging. Not only that, installing a TP-Link repeater allows you to download large files at higher speeds. Therefore, you won’t regret setting up a TP Link WiFi extender. Just in case you are wondering about the TP-Link extender setup process, then we’ve got you covered. Here, you will get acquainted with three methods to perform TP Link extender setup. So, let’s get started.
First of all, we will discuss the process to install a TP Link WiFi extender by accessing tplinkrepeater.net. This TP Link WiFi extender setup method is also known as the Manual method.
Before you proceed to the TP Link WiFi extender setup process, make sure to unbox the device carefully. Once done, follow the steps given below in order to set up your TP Link repeater via tplinkrepeater.net:
Note: The tplinkrepeater username and password should not have any special characters.
That’s it! Your TP Link repeater is now all set to provide you with a lightning-fast internet connection.
Don’t want to involve yourself in a mess of accessing http tplinkrepeater.net? Here’s a good news for you. You can also make your TP-Link extender up and running using the Tether app. Read more to know how.
Tether app is a mobile application that allows users to install their TP Link WiFi extenders with simple to execute steps. Give the following steps a shot to install your TP Link repeater using the mobile application:
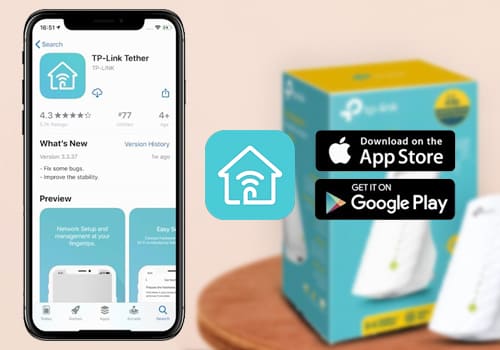
In this way, you can configure your TP Link WiFi extender via the Tether app. If you face any issues while performing TP-Link extender setup, don’t hesitate to get in touch with our technical experts.
Now, it is time to shed light on the process to set up a TP Link WiFi extender via the WPS method. So, read on.
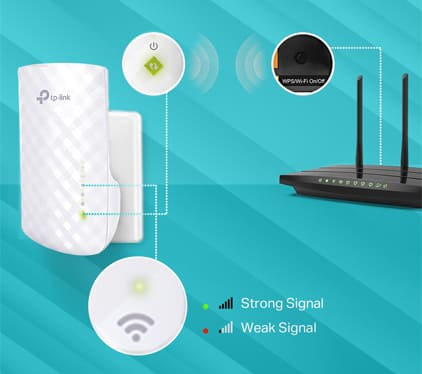
Installing a TP Link WiFi extender via the WPS method is the easiest method. Given below is a list of steps outlining the process of TP Link extender setup using the WPS method:
If you face any issues during the process, ping our experts to seek their help to perform TP Link extender setup.
That’s how you can perform TP-Link extender setup wizard using the WPS method. Now, you are free to enjoy a blazing-fast internet connection.
Considering that you have performed TP Link extender setup, the time has arrived to tweak the repeater’s various settings in order to get the most of it. If you don’t know how to change the extender’s settings, then accessing the Tplinkrepeater.net setup wizard is the answer. Give a read to the following instructions in order to access the Tplinkrepeater.net setup wizard:
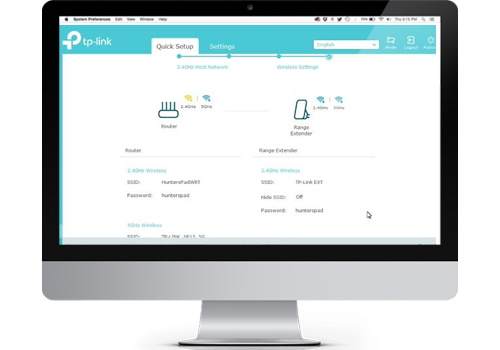
Now, you can tweak the settings of your TP Link WiFi extender and make it high-performing. But, it looks like you are in trouble. Are you unable to access the Tplinkrepeater.net setup wizard? If you nodding in yes, then wait no more to execute the following troubleshooting tactics:
Start troubleshooting the ‘Can’t access TP Link WiFi extender setup wizard’ issue by checking the power outlet. Have you plugged your TP-Link repeater into an active power socket? Probably not. Therefore, consider plugging your repeater into another wall outlet and see if you can access the Tplinkrepeater.net setup wizard.
Another reason why you are unable to access the Tplinkrepeater.net setup wizard might be because of too much distance between your repeater and the host router. To get the issue fixed, bring your repeater and router closer. Remember that in case of a wireless connection, the closeness of your WiFi devices matters a lot.
Quick Tip: If you have used an Ethernet cable to establish a connection between your WiFi devices, it needs to be damage-free.
Installing antivirus software and firewalls might be safe for your computer. But, do you know that they can also halt your access to the Tplinkrepeater.net setup wizard? In order to get the issue resolved, temporarily disable antivirus software and firewall on your computer.
Most users fail to reach the Tplinkrepeater.net setup wizard due to the usage of an incorrect web address. Perhaps, you are following their footprints. Therefore, rectify your mistake and use http tplinkrepeater.net. Also, make sure to type it into the address field of your web browser. Keep in mind that using the search bar won’t lead you to the Tplinkrepeater.net setup wizard.
Accessing the Tplinkrepeater.net setup wizard won’t be possible until and unless you don’t use the correct login credentials. Keep in mind that the username and password to perform TP Link extender login are case-sensitive. It means you have to take care of the uppercase and lowercase characters while typing them. So, stay cautious and consider turning the Caps Lock key on your keyboard off.
You will be surprised to know that the web browser can also be the culprit behind your inability to access the TP Link WiFi extender setup wizard. If the web browser you are currently using is outdated, then it won’t support the TP Link repeater login page and lead you to the issue you’re currently facing. Therefore, update the web browser to get the issue at hand fixed.
Note: To get success in accessing the Tplinkrepeater.net setup wizard, you also need to clear the browser’s cache, cookies, and browsing history. If doing so also fails to bring you luck, ditch the current web browser and use another one.
The more appropriate your extender’s location, the more efficient it will perform. It looks like you’ve placed your extender in the dark corners of your home that has cut its communication with devices rather than building. To make your TP link WiFi extender high-performing, you need to place it in the central location of your home. Once you do that, your WiFi device will equally spread the signals throughout the home.
Apart from that, don’t place your TP Link WiFi extender at a location filled with WiFi interference-creating objects. Keep in mind that microwave ovens, cordless phones, baby monitors, Bluetooth speakers, etc. can mess up your repeater’s WiFi signals. So, maintain a safe distance between your WiFi device and such objects. Last but not least, keep your TP-Link repeater away from mirrors, fish tanks, metal objects, and plants.
By following the aforementioned tips, you will get success in accessing the Tplinkrepeater.net setup wizard. Now, move ahead to know the steps to change the extender’s settings to make it secure and high-performing.
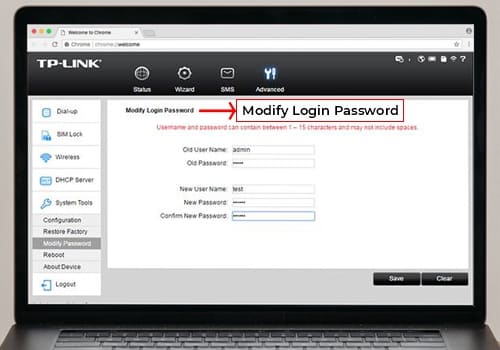
Your TP Link WiFi extender’s security comes first and that is why it is necessary to have strong login credentials. So, just in case you forgot to set a strong username and password, change them with the help of the following steps:
Congratulations! You’ve completed the first step of securing your WiFi extender.
In order to make your extender more secure, consider changing the SSID and WiFi password. It will be helpful because the encryption level of the default SSID of the TP Link WiFi extender is weak and the WiFi password is easy to guess. And, who knows your neighbor turns out to be a hacker? Well, we are not frightening you. But, changing the SSID and WiFi password is another great initiative to secure your TP Link repeater’s WiFi network. Walk through the below-listed instructions to know how:
And you’re done. You have successfully changed the SSID and WiFi password of your extender via tplinkrepeater.net. If you are unable to do so, then feel free to contact our subject-matter experts and take their help.
Hiding the SSID can prove to be a masterstroke in securing your WiFi network. Hiding it will make it invisible from any network list. Thus, you need not worry about it being accessed by unauthorized users.
Following are the instructions your need to follow in order to hide the SSID of your TP-Link extender’s WiFi network:
Now, your device has been added with another layer of security. But, what about improving the performance of your TP-Link repeater? One of the best methods to improve the extender’s performance is by updating its firmware. Let’s have a bigger picture of what firmware is and how upgrading it will streamline your WiFi device’s performance.
Similar to your mobile device, your TP Link WiFi extender also runs on a software. This software is known as TP-Link firmware. This firmware is responsible for the functionality of your WiFi device. If your TP-Link repeater’s firmware is updated it will perform up to the mark. If not, then it might not work efficiently due to the lack of certain new features. Chances are that it can also encounter minor bugs while working. But, updating the firmware regularly won’t let that happen to your TP-Link repeater.
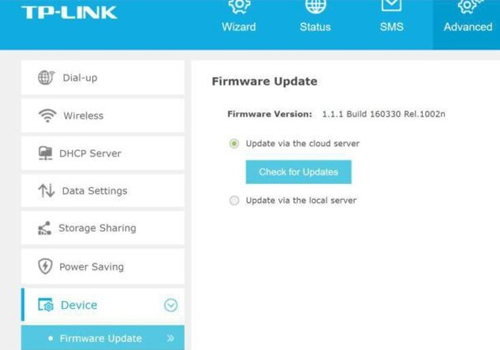
In this manner, you can update the firmware by accessing the TP Link repeater login page, and add new features to your device.
Now, you’ve learned how to perform TP-Link extender setup, change the login details, change SSID and WiFi password, etc. So, get ready to gear up your internet experience with one of the most amazing WiFi devices.
If you come across any issues with your WiFi device, then wait no more to contact our experts. They are working day and night to solve your problems related to TP-Link range extenders.
Although TP Link repeaters are the best option when it comes to expand the range of your existing WiFi, however, at times users face issue while making use of their TP Link repeaters. Some of the most common issues faced by TP Link extender users are as follows:
If you are struggling with any of these issues, then get in touch with our technical experts for quick help. FYI, our experts are 24×7 available to help you fix various WiFi extender issues in a matter of minutes.
1. Extender not turning on. Help me fix it.
If your TP Link extender is not turning on then have a check on the hardware of your device and see if it is working fine. If everything is fine and still your extender is not turning on then cross-check the power outlet to which you have connected to extender. It must be offering an adequate and fluctuation-free power supply.
2. How can I update the firmware of my TP Link extender?
For updating TP Link firmware, log in to your extender by accessing the tplinkrepeater.net web address. As soon as you reach the web management page of your WiFi extender, navigate to Settings and see if any new firmware version is available for your TP Link repeater. Hit Update to get the latest firmware version updated on your range extender.
3. WiFi extender flashing orange. How can I fix it?
Extender flashing orange light issue can occur due to technical glitches. To get it fixed, simply power cycle your extender by unplugging its power cord from its power outlet for some time. Once you feel that sufficient time has been given to your TP-link extender for reviving its performance, plug the cord back into its socket and see if it resolves the orange light issue on your extender.
Disclaimer: We at tplinkrepeater.cc provide online support and information for issues with TP Link WiFi devices. However, we are not involved with any particular organization or brand. The use of trademarks, brand names or logos used on the site should be considered only as for reference purpose. We provide run-time assistance to customers who directly approach us.